October 25, 2016

New Models of Hijab Fashion 2017

New  of Hijab Fashion
New Models  of Hijab Fashion

In 2017 an event to showcase new models of hijab fashion, with the theme of magical fashion hijab with colorful make hijab always trend and become the target of many users, at this time we will discuss about new models of hijab fashion in 2017 with the work of famous designers namely
Read more

October 15, 2016

How To Change Default Operating System For Startup In Windows 10 Dual Boot (With Pictures)

How to changing operating systems for startup
 Change Default Operating System For Startup

Can i change my default operating system,? yes to change the default operating system in your computer is very easy, on this occasion we will discuss How to changing operating systems using Windows 10 operating system, when we had to change the operating system? when we want the operating system that is more then we should be able to change the default operating system for startup multi boot, with technological advances dual boot we can install multiple operating systems on one device and can change their default startup operating system according to our wishes, in this example we have two operating systems, namely windows 7 and windows 10, but I want the windows 10 operating system we make default at startup. When we have a multi-boot operating system then automatically the operating system is first installed is not a default at boot time, how to change the operating system on a computer to dual boot, here we will try how to change the default operating system for startup multi boot.

When do we have to change the operating system, when we are bored with the default operating system on our computer so we can alter the settings to change operating systems on the computer, this only applies for those of you who have the operating system to dual boot and here's how to change the default operating system for multi boot startup, how we could have a dual boot operating system on a single computer and which became the default OS must change the default operating system to fit our desires.
In this tutorial video there are two ways to change an operating system, how do i change the boot order we will discuss the following steps to change the default operating system.

The first way !!!


1. Let's open the windows Run by pressing the Windows key + R in your keyboard.
windows key + R
pressing the Windows key + R in your keyboard.
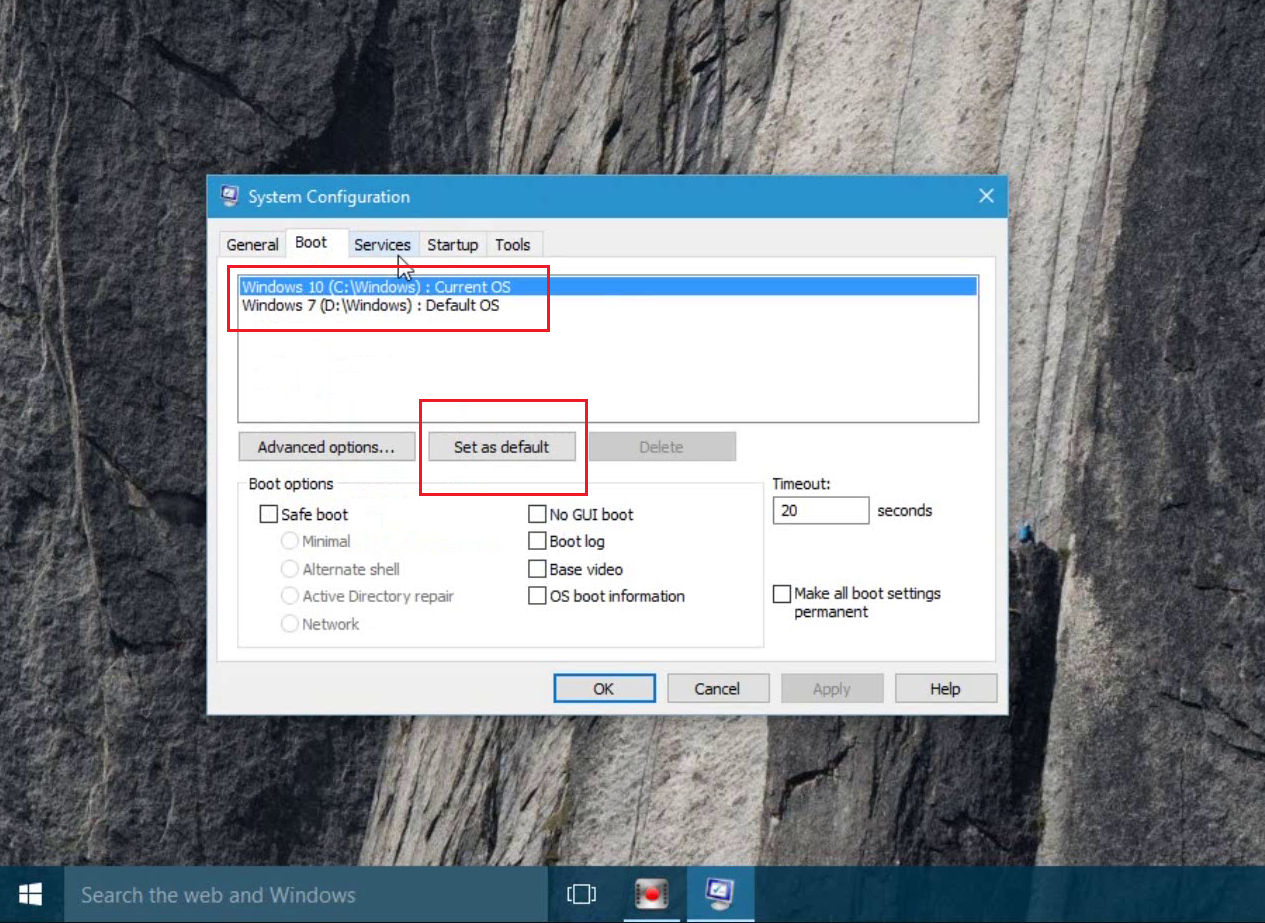
2. Then we type " msconfig " and press enter, then you will see the system configuration, click on the boot menu and select the operating system that we will make a default, after being chosen operating system and then click the button set as default and click apply then ok.
 system configuration
see the system configuration

select OS
change my operating system

3. Then restart your computer then to see the results change my operating system, in accordance with your wishes.
to restart your computer
Then restart your computer


The second way to changing operating systems!!!


1. We open the Control Panel and click System and Security and then click System and select the advanced system settings.
 click System and Security
open the Control Panel and click System and Security

setting operating system
System and security

system
select System

2. In view we select advanced system properties, in the box startup and recovery click the button setting.
click  advanced system properties
select advanced system properties


3. Once open windows startup and recovery select windows that we will make the default operating system, once selected click ok, please restart your computer to see the results of changing operating systems.
advanced
windows startup and recovery

default operating system
changing operating systems please


A few tips to change the default operating system for multi-boot startup, if there are obstacles in changing operating systems please comment below. Want more clearly see the video tutorial how to change the default operating system via the following link https://youtu.be/AM7_N_scmtY  , Thank you for your visit may be useful.

More detail view


Read more

October 9, 2016

How To Erase Windows. Old In Windows 7, 8.1, 10 ( With Pictures)

How To Erase Windows. Old In Windows 7, 8.1, 10
What is Windows old, windows old is a folder that contains files that are not used anymore, files this leftover from previous windows installation, if you upgrade windows to a newer version, the Windows old will automatically appear on the drive: C and was replaced by windows the new, so that the windows old has been functioning for already a file folder windows are new, the windows old will be garbage stored in your drive and should be removed because the size of the windows old is about 4 GB for windows 10 then it will take a great if not promptly removed, how to erase old windows in windows 7, 8.1, 10 and to remove the existing own way can not remove the old windows directly delete course, because there are files that can not be removedmanually so that should be in the following manner.

Where is the old windows located?, How to erase old windows in windows 7, 8.1, 10 locations are in the old windows drive: C with the name of the folder windows. Old and have some files that are in the folder of the old windows. How size of Windows. old?, The size of the old windows is more than 3 GB depending on the version of Windows you are using more and more new windows that you use the size of the old windows will be even greater, should we need to remove the old windows folder because there is no function anymore and becomes garbage stored on our drives. can not delete windows old, is to delete Windows old can not delete it manually should remove with certain tricks so that we can remove windows old safely, how to permanently delete windows old, to delete windows old permanently and does not have a risk of course, we must have how to permanently delete old windows which we will discuss in this tutorial.

What happens if I delete the old windows, old windows is a file or folder from the rest of the windows before, would be no problem if you remove the old windows on the condition that you should remove through the right path, in this tutorial we will try to remove the Windows. old is the correct procedure in accordance with the command of Microsoft windows.
Here is How to erase old windows in windows 7, 8.1, 10 ways I can be used for all versions of Windows 7, 8.1, 10. but in this tutorial we are using windows 7 and it was not much different to windows 8 or 10.

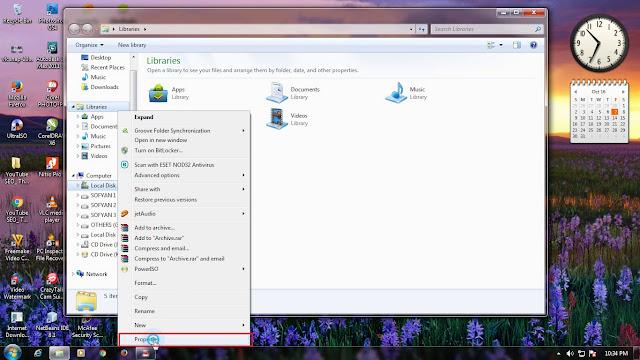
1. We open the drive: C then right-click and select Properties,
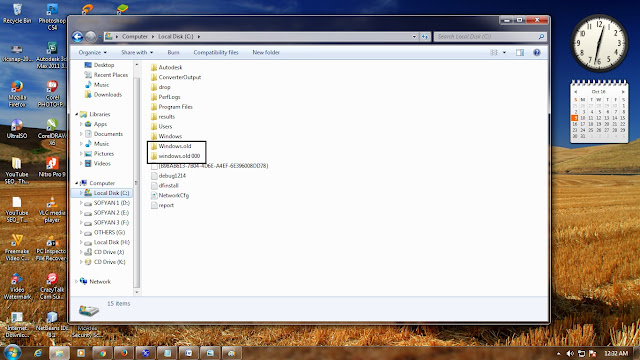
How To Erase Windows. Old In Windows  8.1, 10
How To Erase Windows. Old In Windows  8.1, 10

How To Erase Windows. Old In Windows  10
How To Erase Windows. Old In Windows  10

2. Then it will appear on the local disk (: c) properties and click the Disk Cleanup button, wait until the scanning process is completed, if it is completed it will display the disk cleanup (: c) 
Disk Cleanup button
properties and click the Disk Cleanup button

previous Windows installation

3. In the Disk Cleanup for (: c) find "previous Windows installation (s)" and if there is no previous Windows installation (s) you can repeat the scanning invitation click the "clean up system files" will return the drive scanning, if no please be repeated until it appears. 
After the "previous Windows installation

4. After the "previous Windows installation (s)" then we mark or tick to select it, and we have this check can be removed permanently then you must be careful in choosing the list, if it is checked then select the button "ok" and wait until the cleanup process is complete and you can see the results in the drive: C. 
removed permanently
removed permanently 

tutorial How to erase old windows in windows

A few tutorial How to erase old windows in windows 7, 8.1, 10. Good luck if there is a failure just discussed together in the comments below.

More Detail View Video Tutorial :


Read more

August 30, 2016

3 way: Download a Video From Youtube Without Software ( With Pictures )

3 way  download a video from youtube without Software
3 way  download a video from youtube without Software
how do i download a video from youtube, a collection of video tutorials and complete most are on youtube, youtube.com is a place to learn about all the things using video so that we better understand since we are invited to immediately practice, however, for we could have a video of youtube for free is to download the video, Many ways you can do for how to save youtube videos to computer free for youtube allows to download videos from youtube for free. save youtube videos to computer for free there are many ways one of them to be able to download videos on youtube with the help of software, but here I will give you how to download and save any video from youtube without any software to be easy without having to install software, how simple free save youtube video to computer without an very fast software for download, 3 ways to save youtube videos directly from youtube free online will be easier because we do not have to install the software first, let's download and save youTube videos without software and fast.

1. The first way to saving youtube videos to computer free is to use Keepvid.com, keepvid This is a website that can be used to download video from youtube for free and easy. The advantages of using keepvid download this video you can choose the video format that you download from the HD format to 3gp video format you can choose the format as you want, the better the video format that you download the greater the size of the video. To download and save any video from youtube using keepvid.com do is we have to choose the video that will be downloaded to copy the video address that will be downloaded, for example youtube video URL address: https://www.youtube.com/watch? v = c35dat5R6xY then we copy the video URL address into the field provided on the website keepvid.com then click download, it will appear a lot of video formats you just select / click the video format will automatically be downloaded later.
download and save any video from youtube use keepvid.com 0

how to save youtube videos on computer use keepvid
how to save youtube videos on computer use keepvid 1

save movie from youtube using keepvid.com 2


2. How simple to download video from youtube is to add the letters "ss" in front of the posts youtube.com, by adding ss you will be redirected to the download site for free youtube, how to download a quick video we first have to choose a youtube video which will we download, after we add the selected videos letter (ss) right before writing https: // youtube.com/watch?v=c35dat5R6xY we add the letter (ss) in front of an example: https://www.ssyoutube.com/watch? v = c35dat5R6xY then press enter you will be redirected to the site savefrom.net and to select the video format you can click the down arrow will appear many video formats that you can select it, then click the download button to have the video of your choice.
download video from youtube 3

how to download a video from youtube 4

youtube video downloader 5

how to do download youtube videos fast 7


3. An easy way to saving youtube videos to computer without the help of software, we just add the URL youtube.com Sfrom.net/ front of it, this way you can download youtube videos without software by adding a writing sfrom.net right in front of the URL youtube , after we opened the youtube video of course we will know the URL address that is in the video youtube video URL addresses tab as follows: https: // youtube.com/watch?v=c35dat5R6xY after that you just add "sfrom.net/" front Url video example: sfrom.net/https:// youtube.com/watch?v=c35dat5R6xY later you will be redirected to the web savefrom.net and you can click on the download, you can have a video that you want for free on youtube.
how do u download videos from youtube 6


how to do download youtube videos fast
how to do download youtube videos fast 


So much from me just sharing about downloading a video from youtube without Software, to simplify video downloads without the help of software, when we know the trick to download videos from youtube without any software we will always have a huge collection of videos that we want, welcome to download and save a youtube video.
Read more

August 29, 2016

How To Uninstall Deep Freeze Without Password ( Manual not use Software)

How  To Uninstall Deep Freeze Without Password
How  To Uninstall Deep Freeze Without Password
Deep Freeze is a software that we can use as a safety drive on our computer and is very effective for preventing viruses that attack our computer, with Faronics Deep Freeze certainly drive of our computer will be safe protected from virus threats because of the deep freeze will protect the drive from entering the drive that we have set, but many obstacles in using deep freeze one of them if we forget the password deep freeze of course we could not open as admin deepfreeze and if you forget your password we will have difficulty to open the deep freeze and it will be difficult to uninstall deep freeze, if our software Faronics Deep freeze expired course we must remove deep freeze 6 from pc or laptop, and many of us who struggle to remove Deep Freeze 8 from the computer for deep freeze goes on behind the scenes so that we can not remove deep freeze 7 from the computer without certain tricks.

But do not worry here we will discuss how to remove deep freeze from the computer without a password in detail and has been tried successfully to 100%, for those of you who have difficulty uninstall deep freeze you shall see the tricks to uninstall deep freeze whiteout password is easy to do for anyone, we will discuss a solution to uninstall deepfreeze without additional software and this is how I did managed to 100%. In the experiment remove deep freeze from the computer without the password I do this in windows 7 operating system with a version of Deep Freeze Standard 8.30.020.4627 and I've already done successfully.

How to uninstall deepfreeze whiteout password is very easy and very fast just 2 steps to remove deep freeze in your computer, if we are going to uninstall or remove deep freeze on the computer via the control panel then it will not be as deep freeze would not be detected in the control panel so as to remove deepfreeze without the password we need tricks to succeed to uninstall deepfreeze without the password very easy following his steps.

 1. We tried to open the Deep Freeze password remembered us and if it does not successfully follow the next ledge. 
open the Deep Freeze password remembered
open the Deep Freeze password remembered 

2. We will try to see whether deepfreeze still running on our computer ?. to see the current deep freeze can pass the task manager, by right-clicking on the tab and then select a star under task manager, turned out to deep freeze is still active. How to remove deep freeze? 
 deepfreeze still running on our computer
 deepfreeze still running on our computer

3. Before you uninstall the program of course we have to end process so that we can uninstall the program, but the deep freeze in the end process could not otherwise get into the admin menu, end process solutions whiteout password deep freeze. End process try deep freeze through the task manager, it can not, there is a message the operation could not be completed. access is denied, see the next way.
End process try deep freeze

How to uninstall deep freeze
How to uninstall deep freeze 


4. How to uninstall deep freeze so we have to change the year and date in order for the deep freeze our computer can not detect or recognize our computer so deep freeze is no longer active, namely by changing the date in the year and added up to 24 years in the future in order to deep freeze is not recognized again, but if the deep freeze is still active it will be seen in the task manager, for that we change the year and date to 24 years or more until undetectable in the task manager again. This trick I did and managed to 100%.
deep freeze is no longer active

5. Here's how the pitch is important is to change the date and year via bios, please restart your computer and then press "delete" or F1, F2, F12 depending on the type of your computer, to enter the bios menu. if it does not work please try again to enter the bios. Once entered bios to change the date and year select standard CMOS features press enter then you change the year and date to 24 years ahead example: June 22, 2040. Press enter and press F10 to save and then ok. Then we go to see a change in the windows if successful it will be in accordance with which you change if you have not changed it must be repeated again, I emphasize his key to successfully uninstall deep freeze is in changing this bios, please try to change according to the instruction.

change the date and year via bios

change the date  via bios
change the date  via bios


 6. After successfully changing the year on a compute, we can check whether the deep freeze is still running on our computer, if it is not detected in the task manager means staying one more step to uninstall deep freeze.
uninstall deep freeze

 7. Open the master Deep freeze that you have and run, then will open the menu and select uninstall deep freeze then uninstall deepfreeze process will run, and if there is a message that is still active deepfreeze then we must change years longer. This trick I did and managed 100% key is to change the year in the bios. If not successful then repeat step 5.

Open the master Deep freeze
Open the master Deep freeze 

uninstall the master Deep freeze
uninstall the master Deep freeze 

how to uninstall deep freeze whiteout no password
how to uninstall deep freeze whiteout no password 

So much from me just sharing my experience on how to uninstall deep freeze whiteout no password using just software manual and simple trick, if there are still obstacles can ask questions by commenting.


More Detail See Video Tutorial


Read more

May 31, 2016

How to Add SEO Meta Tags Description to Blogger Post

How to Add SEO Meta Tags Description to Blogger Post
How to do seo for blogspot, Mechanical seo is a way obliged to do by a blogger in order to make a post becomes easier in a Google search, seo add Meta Description in the post is important because it will add to the information on the content that we create, the following will be discussed how to search engine optimization (SEO) in the meta tag description in blogger, SEO meta description tag is often considered trivial by some have yet SEO techniques meta tags are very important for a content that is always easily recognized by search engines, how to optimize SEO meta tags Description to Blogger post course, we must know in advance what the Description Meta Tags? meta tag description is a place that is used to add some information on the content that we make or can be called the element that serves to put additional information in an image or the content being created, so the Meta Tags Description enabled to reinforcing the information in order to recognize by search engines like Google, meta tags Description can be used as additional information in the image and content is a combination of keyword and title to be easily recognized by search engines so that when someone searches for a particular word, the meta description tag will display the word has in common with the word in the search by the user.

Once we understand the function and use Meta Tags Description course, we must realize how important an add Meta Tags Description as an outline of the content, with many requests in a way to add Meta Tags Description on blogger then we create an article How to add SEO Meta Tags Description to meet user demand, on this occasion there was a case of like where I display add meta tags Description to Blogger post, because the blogger new version no box of SEO writing meta tags Description so we have to add manually and is very easy for us to come up with meta tags this description, many cases in the new blogger when after writing the content is completed and will write the meta tag description on the box post meta tags Description page, post does not appear meta tags Description, so we must do the settings to come up with meta tags Description in the post as a key word a content, how to add SEO Meta Description tags will be more clearly Blogger video tutorial to see how to add Meta Description tags to Blogger post but here we will explain how to display the meta tag description at blogger post.
How to show your Meta Description Tags to Blogger post by:

1. Go to our blog dashboard and select settings

our blog dashboard and select settings

2. Search Preferences  >  meta tag and click edit

Preferences  meta tag and click edit
 Preferences  meta tag and click edit

3. Select yes and save the change.
Select yes and save the change

Here's how to apply SEO bloggers with posts and tips to add Meta Description Tags to Blogger post, for that is unclear can ask in the comments and will be more clear if you see and  listen to this video tutorial.


Read more

May 21, 2016

Tutorial How to Convert JAR to EXE using Launch4j

     
Tutorial How to Convert JAR to EXE using Launch4j
 In this tutorial we will discuss How to Convert jar to exe Using launch4j, free software to convert from jar to exe we can get it for free because the software launch4j licensed BSD, for those of you who do not already have software launch4j you can download launch4j first to be directly convert jar to exe. before we start to convert .jar to .exe way we need to know in advance what is the .jar and .exe., is a .jar extension stands for Java Archive, JAR file extension is a collection of files complications java classes and supporting files another is to compress the result of programming and program design can already run and has become an application.

While the .EXE file is How to Convert jar to exe Using launch4j a way to make an application that can run on the operating system, the .EXE is a file which is an extension that is so that we can immediately execute or we executable only by clicking the .EXE file. Here is How to Convert jar to exe Using launch4j, okay just after you install launch4j then open / run the software launch4j to immediately begin to convert JAR to EXE, we will be setting launch4j only the essentials only the following are examples of setting Launch4j.

1. Once the application is open launch4j have a view as follows, to start convert jar to exe, the basic view, we point * output file to save the EXE file on our hard drive. In the column * Jar we point where we store the jar file that we will make EXE. And to add an icon to the EXE files we could add through a column of icons, but you must have an air picture Ico extension, while the other column you can browse according to your taste.
to start convert jar to exe,
to start convert jar to exe

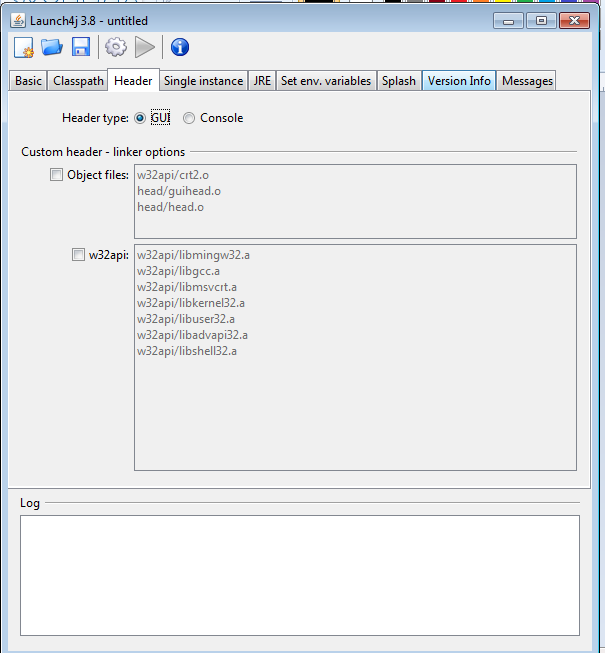
 2. On the header menu we select the GUI, because the file that we will make EXE has the look of the graphic user interface, if the jar file you just have a simple display you can select Console.
graphic user interface

 3. On the JRE you are required to include such instance version 1.0.1 version and please fill in the fields because only as supplementary information only.
On the JRE
On the JRE

 4. After you have finished adding information, we immediately convert jar to exe with a picture of the menu click wheel gears and you can see the results of the .EXE file that was so. Good luck, for those of you who are still confused to Convert jar to exe Using launch4j you can comment here.

More detail see This Video


Read more
  • Popular Post
  • Video
  • Category